Factory Building A2, southwest corner of the intersection of Zong'er Road and Hengyi Road,Hefei Circular Economy Demonstration Park, Feidong County,Hefei City, Anhui Province
You are here: Home » News » How Is a Boltless Metal Shelf Assembled?
How Is a Boltless Metal Shelf Assembled?
Views: 0 Author: Site Editor Publish Time: 2026-08-20 Origin: Site
Facility upgrades and capacity expansions often hinge on minimizing operational downtime. From expansive distribution centers to specialized commercial storerooms, the installation speed of storage infrastructure remains a critical financial variable. Traditional bolted shelving systems require specialized tools. They demand extended labor hours and cause significant operational disruption. Adopting alternative systems without understanding their structural mechanics introduces severe risks. These risks directly impact load capacity and workplace safety. Evaluating the assembly mechanics of a Boltless Metal Shelf provides necessary insight. It reveals the system's structural integrity and ease of reconfiguration. Understanding these mechanics proves its viability as a scalable solution for high-density storage environments. Proper installation ensures maximum load bearing capability while keeping deployment times short.
Rapid Deployment: Boltless systems utilize a rivet-and-teardrop or slot mechanism, reducing assembly time by up to 40% compared to traditional bolted industrial steel storage racks.
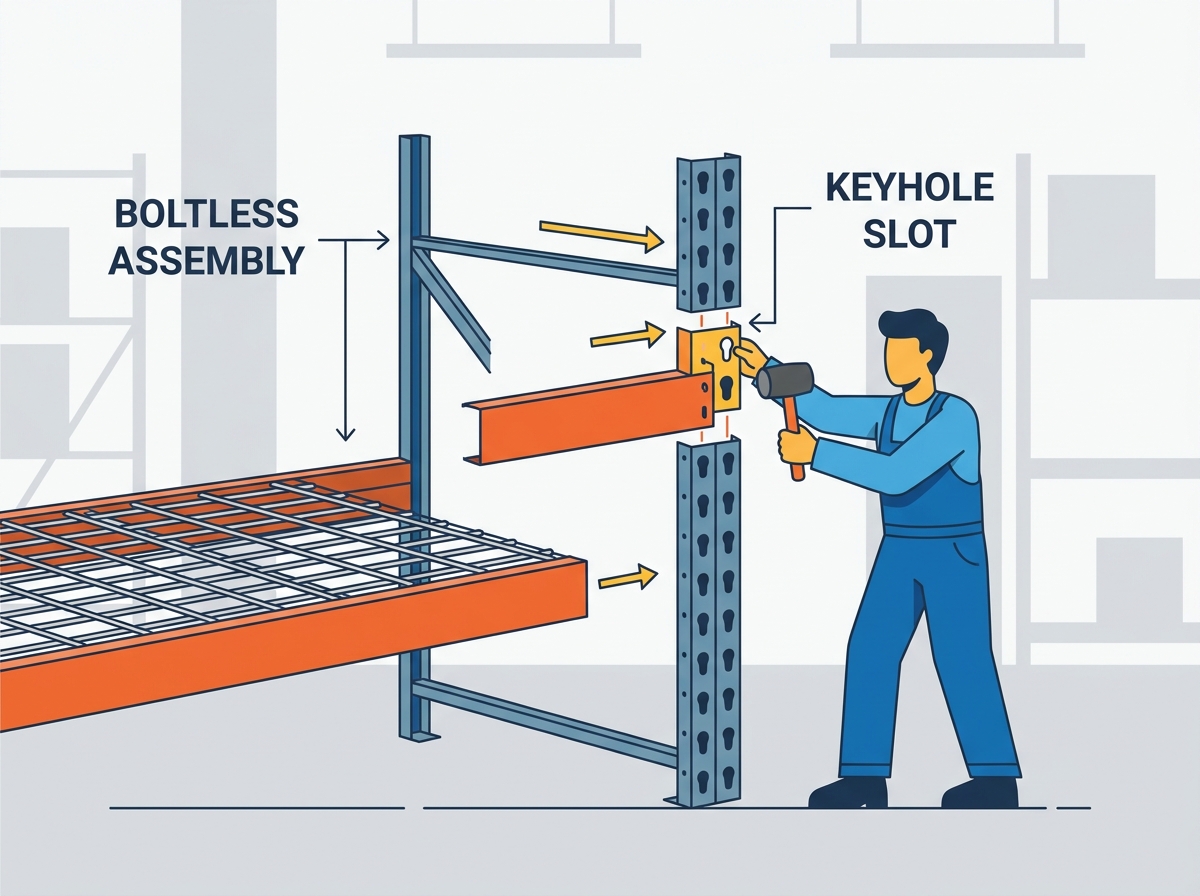
Minimal Tooling Required: Assembly relies almost entirely on a rubber mallet, eliminating the need for power tools and specialized hardware.
Precision Equals Capacity: The structural integrity and load-bearing capabilities of heavy duty warehouse racks depend entirely on the correct seating of rivets and the levelness of the foundational floor.
Scalability: The modular nature of boltless metal shelving allows for rapid teardown and reconfiguration to accommodate fluctuating inventory profiles across diverse environments.
The Engineering Mechanics of a Boltless Metal Shelf
Buyers must understand how a system without traditional fasteners achieves industrial-grade load capacities. The absence of nuts and bolts often raises questions about structural stability. Boltless systems rely on advanced mechanical engineering principles. They use gravity and load distribution to create a rigid framework. This design eliminates the shear stress points common in bolted connections. When you load a shelf, the weight pushes down on the horizontal beams. This downward force drives the rivets deeper into the tapered slots on the uprights. The connection grows tighter and more secure as the load increases.
Rivet and Keyhole Design
The core of this system is the gravity-fed locking mechanism. Upright posts feature precisely punched keyhole or teardrop slots along their entire length. Horizontal beams contain welded steel rivets at each end. When a rivet enters the wider top portion of the slot, it drops into the narrow bottom section. Downward pressure from stored inventory forces the rivet tighter into the wedge. This physical action actually increases the rigidity of the frame. The heavier the load, the tighter the connection becomes. We see this principle applied in heavy machinery mounting. The friction fit prevents lateral sway and vertical dislodgement.
Component Breakdown
A standard unit consists of four primary components. Angle posts serve as the vertical uprights. They bear the entire compressive load of the system down to the floor. Double-rivet angle beams form the perimeter of each shelf level. They provide necessary lateral stability and prevent the frame from twisting. Single-rivet beams offer intermediate support for lighter loads or narrower spans. Finally, decking materials sit flush inside the beam recesses. This creates a smooth, continuous storage surface. You will also find center supports on wider units. These prevent the decking from sagging under concentrated point loads.
Load Distribution Mechanics
Understanding how weight transfers through the frame prevents overloading. When you place a heavy pallet or loose inventory on the decking, the material flexes slightly. This flex transfers the kinetic energy outward to the perimeter beams. The double-rivet beams absorb this energy and channel it down the vertical angle posts. The posts then drive the force directly into the concrete floor. This continuous load path requires every component to function perfectly. If one rivet fails to seat, the load path breaks. The weight then shifts unevenly to the remaining connections, causing rapid metal fatigue.
Comparison to Bolted Systems
Facility managers must objectively weigh the trade-offs between storage designs. Bolted systems offer hyper-customized bracing. They remain necessary for extreme seismic zones where ground movement is a constant threat. Boltless systems prioritize modularity and rapid deployment. An industrial steel storage rack utilizing a boltless design adapts quickly to changing inventory. It requires less maintenance over time because there are no bolts to vibrate loose from forklift traffic or daily loading activities.
Pre-Installation: Site Preparation and Risk Mitigation
Assembling storage units on unprepared surfaces leads to structural twisting. This twisting compromises the rivet connections and invites catastrophic load failures. Proper site preparation prevents these hazards. It ensures the shelving reaches its maximum engineered capacity. Skipping this phase guarantees future structural problems. Treat the concrete slab as the foundation of the entire system.
Floor Assessment
You must evaluate the concrete slab before unboxing any components. Check the floor levelness using a long spirit level or a laser level. Identify any expansion joints or severe cracks. Do not place upright posts directly over expansion joints. Verify the floor's point-load bearing capacity. High-density storage concentrates immense weight onto four small footprints. Weak concrete will crack under this localized pressure. If the floor slopes more than a quarter inch over ten feet, you must use steel shims under the base plates.
Advanced Leveling Techniques
Uneven floors present the most common obstacle during installation. You cannot simply eyeball the frame and hope it stands straight. Use steel shims under the footplates to correct minor floor variations. Stack the shims carefully, ensuring they fully support the base of the upright. Never use wood or plastic shims, as they will compress or rot over time. For severe slopes, you may need to pour a self-leveling concrete pad before erecting the system. Establishing a perfectly level base prevents the frame from leaning and binding during the upper-level assembly.
Spatial Constraints and Clearance
Assess the assembly environment carefully. Confined spaces like commercial storerooms or reinforced utility shelters pose unique challenges. You must ensure adequate overhead clearance for standing the uprights. Lateral clearance is equally important. Installers need sufficient room to swing a mallet effectively. Without proper clearance, rivets cannot be seated fully. This compromises the entire structure. Plan your assembly sequence based on the room's dimensions.
Staging the Area
Implement best practices for unboxing and staging components. This streamlines the assembly workflow and prevents component damage. Follow this staging sequence:
Clear a 10x10 foot minimum staging area adjacent to the installation zone.
Unbox all vertical angle posts and lay them parallel on the floor.
Group double-rivet beams and single-rivet beams into separate stacks.
Inspect all keyhole slots and rivets for manufacturing defects or shipping damage.
Stage the decking boards flat on a pallet to prevent warping before installation.
Tool and PPE Requirements
Assembly requires specific, minimal equipment. You need a non-marring rubber mallet, a heavy-duty level, work gloves, and safety footwear. Explicitly warn all personnel against using steel hammers. A steel hammer will crush the rivet heads. It will also deform the keyhole slots. Deformed components cannot lock together properly. This instantly voids the manufacturer's load rating for the warehouse storage racks.
Step-by-Step Assembly Process for Boltless Metal Shelving
Following a strict sequence guarantees a square and stable structure. Rushing the build guarantees out-of-plumb frames. A methodical approach ensures every connection reaches its maximum holding power. Always assemble units on a flat, clear surface.
Step 1: Constructing the Base Frame
Begin by connecting the first set of double-rivet beams to the bottom of the angle posts. These beams must sit as close to the floor as possible. This establishes a low center of gravity. Tap the rivets into the lowest available slots on two uprights. Repeat this process for the opposite side. Connect the two sides using the front and back double-rivet beams. Establish a perfectly square foundation. Measure diagonally from corner to corner. The measurements must match exactly.
Step 2: Erecting the Uprights
Stabilizing the vertical posts requires coordination. While attaching the side and back beams, hold the uprights perfectly vertical. A two-person team is mandatory for a heavy duty warehouse rack configuration. One person holds the frame steady. The other person aligns and strikes the beams. Attempting to erect tall uprights alone often results in bent connection points. The leverage of a falling post easily damages the keyhole slots.
Step 3: Seating the Rivets
The correct technique for striking the beams dictates the final structural integrity. Use a heavy rubber mallet. Strike the beam close to the joint, not in the center. Striking the center causes the beam to bounce and absorb the impact. The rivet head must sit completely at the bottom of the teardrop slot. You will hear a distinct, solid thud when the metal seats properly. There should be no visible gap between the beam and the upright.
Step 4: Installing Intermediate Levels
Measure and space the single-rivet beams based on specific inventory height requirements. Count the visible slots on the uprights to ensure level placement. Do not rely on visual estimation. Install the front and back beams first, followed by the side supports. Check the levelness of each shelf before moving to the next. Adjustments are easiest before the decking is installed.
Step 5: Decking Placement
Evaluate your decking options carefully. Wire mesh, particle board, and melamine each serve different operational needs. Secure the decking within the stepped beam recesses. This prevents shifting during loading and unloading. The decking also acts as a horizontal brace. It keeps the perimeter beams from bowing inward or outward under heavy loads.
Decking Installation Best Practices
Installing the decking requires proper alignment to avoid pinching the material. Angle the board slightly and slide one edge into the rear beam recess. Lower the front edge slowly until it rests flat on the front beam. If the decking binds or refuses to sit flush, do not force it. Check the frame for squareness. A frame that is out of square will pinch the decking. Tap the corners of the frame with your mallet to realign the uprights until the decking drops in smoothly.
Decking Material Comparison
Material Type
Load Distribution
Best Application
Moisture Resistance
Wire Mesh
Excellent for uniform loads
Fire-code compliance, cold storage
High (Galvanized)
Particle Board
Good for solid, flat items
General dry goods, boxed inventory
Low
Melamine Coated
Good for sliding items
Retail backrooms, clean environments
Medium
Solid Steel Panels
Superior for heavy point loads
Dies, heavy machinery parts
High
Evaluating Scalability and System Integration
Boltless systems fit seamlessly into broader facility layouts. Their modular design allows them to adapt as operational needs evolve. You can configure them as standalone units or expansive, interconnected aisles. This flexibility makes them ideal for dynamic supply chains.
Adapting to Confined and Specialized Spaces
Deploying storage in tight footprints requires strategic planning. Commercial storerooms or basement utility shelters demand maximized vertical density. You must achieve this without compromising accessibility. Assemble the base frame outside the confined space if possible. Slide the partially assembled unit into position. Then, add the upper levels. This strategy overcomes the lack of lateral clearance for mallet swings. Using metal shelving in these areas keeps inventory organized without requiring permanent structural modifications to the building.
Connecting Multiple Units
Creating continuous aisles maximizes floor space utilization. Tie-plates bolt the tops of adjacent uprights together. This creates a rigid row while maintaining structural independence. Shared uprights use a single post to support beams from two adjacent units. This reduces the total component count. It requires careful recalculation of the upright's total load capacity to prevent overloading the shared column.
Integration with Existing Systems
Adding boltless units alongside legacy pallet racking requires spatial planning. Mixing a new warehouse storage rack with older bolted shelving demands consistent aisle widths for material handling equipment. Match the shelf heights where possible to maintain a clean visual line. Do not attempt to physically bolt different proprietary systems together. This creates unpredictable stress points.
Vertical Expansion
Safely adding height to existing units requires strict adherence to engineering limits. You can use post splicers to connect new uprights to the existing frame. This vertical expansion mandates a reassessment of load limits. The lower uprights now bear the combined weight of all levels above them. Verify that the total weight does not exceed the manufacturer's maximum column capacity. Always anchor vertically expanded units to the floor.
Reconfiguration Strategies
Inventory profiles change constantly. Your storage infrastructure must adapt to these shifts without requiring entirely new systems. Boltless designs excel in this area. You can adjust shelf heights in minutes by tapping the beams upward to unseat the rivets. Move the beam to the new desired height and tap it back down. This rapid reconfiguration allows you to accommodate taller pallets or denser picking bins on the fly. Train your warehouse staff on this simple adjustment process to maintain optimal storage density year-round.
Common Installation Errors and Structural Compromises
Identifying points of failure during the assembly phase ensures long-term safety compliance. Most structural failures stem from improper installation, not defective materials. Routine inspections must target these specific installation errors.
Incomplete Rivet Seating
Partially engaged rivets create a dangerous false sense of security. Incomplete seating leads to beam deflection. When a load is applied, an unseated rivet may suddenly slip into place. This sudden drop creates a shock load. The shock load can shear the rivet or buckle the upright. Localized collapse under heavy loads often traces back to a single unseated connection.
Out-of-Plumb Uprights
The compounding danger of assembling racks without a level cannot be overstated. Even a one-degree tilt drastically reduces the stated weight capacity. A leaning upright introduces lateral forces that the system was not designed to handle. Gravity pulls the load sideways rather than straight down. This lateral stress bends the keyhole slots and warps the angle beams. Always shim the base plates to achieve perfect vertical alignment.
Ignoring Anchoring Protocols
Height-to-depth ratio rules dictate physical anchoring. Typically, a 4:1 or 6:1 ratio applies depending on local building codes. If a unit is 8 feet tall and 2 feet deep, the ratio is 4:1. This unit must be anchored to the concrete slab. Anchoring prevents the unit from tipping forward during loading. It also provides stability against forklift impacts and seismic events. Use heavy-duty wedge anchors designed specifically for concrete applications.
Seismic Considerations and Bracing
Facilities located in active seismic zones face strict regulatory requirements. While boltless systems offer excellent vertical load capacity, they may require additional lateral bracing to withstand earthquakes. Check your local building codes before installation. You may need to install cross-bracing on the back and sides of the units. This bracing prevents the frame from swaying and collapsing during ground tremors. Consult a structural engineer to determine the exact bracing requirements for your specific geographic location and soil type.
Conclusion
Execute the following steps to finalize your storage system implementation:
Conduct a comprehensive facility floor audit to map concrete levelness and identify expansion joints.
Calculate exact load-per-shelf requirements based on your heaviest anticipated inventory.
Procure non-marring rubber mallets and heavy-duty levels before unboxing any components.
Consult with a storage system engineer to finalize the configuration and verify anchoring requirements.
FAQ
Q: Do I need special tools to assemble a boltless metal shelf?
A: No specialized power tools are required. Assembly is completed using a rubber mallet to seat the rivets into the keyhole slots, alongside a standard level to ensure structural plumbness. Never use a steel hammer, as it will damage the rivets and the steel frame.
Q: How long does it take to assemble a standard warehouse storage rack?
A: A standard standalone boltless unit can typically be assembled by two trained personnel in 15 to 30 minutes. This timeframe depends on the number of shelf levels, the overall dimensions of the unit, and the clearance available in the assembly area.
Q: Can a boltless industrial steel storage rack handle heavy loads?
A: Yes. When properly assembled and placed on a level surface, heavy-duty boltless racks can support anywhere from 800 to over 2,000 pounds per shelf level. The exact capacity depends on the beam gauge, the rivet configuration, and the chosen decking material.
Q: Can I assemble a boltless metal shelf in a tight space like a storeroom?
A: Yes, but it requires careful spatial planning. Assemble the base and uprights in a slightly more open area before sliding the unit into its final confined footprint. This ensures you have enough clearance to properly swing the rubber mallet.
Q: Do boltless metal shelving units need to be anchored to the floor?
A: Anchoring requirements depend on the height-to-depth ratio of the unit and local seismic codes. Generally, if the height exceeds four times the depth of the base, floor anchoring is required for safety. Always consult local regulations before finalizing the installation.
Q: What happens if the floor is not level during assembly?
A: Assembling on an uneven floor prevents the rivets from seating properly. It causes the steel frame to twist and severely degrades the load-bearing capacity. This creates a significant safety hazard and increases the risk of structural collapse under heavy inventory loads.
WhatsApp: +8618919627550 Tel: +86-18919627550 Email: anhuiwenrui@gmail.com 18919627550@163.com Address: Factory Building A2, southwest corner of the intersection of Zong'er Road and Hengyi Road,Hefei Circular Economy Demonstration Park, Feidong County,Hefei City, Anhui Province